
This month’s Tip shows you how to create some simple tables using the Riser tool in Vivien. A “riser” is a simple, 3D rectangular object — like a box or cube. It helps to think of the Riser tool as a “box builder”. In Vivien, you use risers to design platforms, square columns, or any other box-like objects.
All 3D objects are made up of basic elements — including risers, cylinders, and spheres. Take a look at everyday objects around you. Think about how an object can be broken down into simple 3D elements. For example, consider a simple bar table: The base is a long cylinder with a small diameter, while the tabletop is a short cylinder with a large diameter.
With this Tip, you’ll also gain a better understanding of how to combine basic 3D shapes to create more complex objects, such as picture frames, speaker stands, and multi-level stages. You’ll learn to see everyday objects as basic shapes that you can combine to recreate them in Vivien. In this Tip, you’ll use the Riser tool to create three different tables. With Vivien—Virtual Event Designer, it’s easier than you think!
Here’s the scenario: Your client wants to add a table to the venue design. Your first step is to open the Library Browser to look for a suitable table in the Vivien library, which features an extensive library of predefined objects that you can quickly add to your drawings. The Library Browser is categorized to help you find the items you are looking for.
If you need a unique design, you can create a custom table using Vivien tools, such as the Riser tool. In Vivien, it is simple to create simple objects, such as a basic table.
Table #1: Simple Table covered by a tablecloth
For this first table, you’ll keep it basic. Using the riser tool, you will create a simple table with the same height, width, and depth as your client’s table. For the top and sides of the table, you can add a white tablecloth and a simple overlay that matches your client’s colour theme. This basic design provides the look-and-feel of a simple table covered with a tablecloth and overlay.

Note: These procedures assume that you have created a venue in Vivien.
1. Open your Vivien event document. You’ll want to set the view of your room from the top (“floor plan”). In Vivien, this is the Plan view.
2. From the View menu, choose View Type and then choose Plan.
3. From the Draw menu, select Riser.
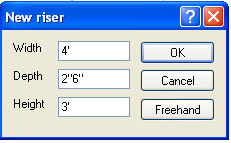
4. In the New Riser dialog box, type the following dimensions for your table and click OK:
• Width: 4’
• Depth: 2’6”
• Height: 3’
5. In the work area, click to place the table in the desired location of the venue design.
Your table is very basic, so let’s add a tablecloth.
6. Click the table to select it. Now, right click and choose Properties.
7. Click the Appearance tab and choose a tablecloth colour for the top and sides of the riser.
Now you can add an overlay using a colour from the event’s theme. Before you create the overlay, it is important to set the height at which it is placed. You’ll set the height at 3’0”1/32 (3’ height of the table plus 1/32’), which represents the distance between the riser and overlay. You need do this to add a small barrier between the riser and overlay to prevent the colours of both surfaces from mixing and distorting your Virtual Views and renderings.
8. On your keyboard, press TAB. In the Height dialog box, type 3’0”1/32, and press OK.
9. Zoom in on the riser by pressing PAGE UP on your keyboard. This will help you to place the overlay precisely.
10. To view the grid in your work area, press the Grid Snap icon.

11. From the Draw menu, select Surface.
12. Using the following graphic as a guide, click near the bottom left corner of the table and—working in a counter-clockwise direction—click each of the four corners of the overlay.

13. Click the fourth corner, then right click and select Finish Surface.
14. To select the overlay, click it. Now right click and choose Properties.
15. Apply the desired texture and colour, as you did in step 8 for the tablecloth.
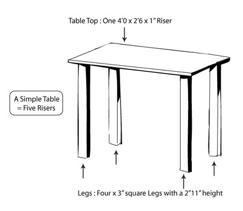
Table #2: Table with four legs
Your client is asking for a more complex design. You’ll need to create a table that is 1” thick top with four square legs each measuring 3” wide. Easy — that’s 5 simple risers.
For this table, let’s use the following dimensions:
• Width: 4’
• Depth: 2’6”
• Height: 2’6”
Your first riser will become the tabletop. You need to set the height (to place it at the proper height off the floor) and draw the supporting legs underneath. Since the tabletop is 1” thick and you want it to rest 2’6”’ off the floor, the Height value is calculated as follows: 2’6”- 1” = 2’5”. At first, it will look like the tabletop is floating in the air, but you will draw the supporting legs later.
Let’s set the height at which to place the first riser and create the tabletop.
1. On your keyboard, press TAB.
2. In the Height dialog box, type 2’5”. Click OK.
3. From the Draw menu, select Riser.
4. In the New Riser dialog box, type the following dimensions for your table and click OK:
• Width: 4’
• Depth: 2’6”
• Height: 1″

5. In the work area, click to place the riser on the drawing.
Note: This first riser has a thickness of 1” because it represents the tabletop only. The height of the table is in the legs, which you will draw next.
Remember, the Height value in Vivien stays the same until you reset it. Before drawing the legs, you must return the height back to 0’, so that the legs actually stand on the floor.
6. Press TAB on your keyboard. In the Height dialog box, type 0’ and click OK.
Using Vivien’s most versatile tool, the Riser tool, you will create the four legs.
7. From the Draw menu, select Riser.
8. To create a table leg that is 2’5” high and 3” wide, you need to create a new riser. In theNew Riser dialog box, type the following dimensions for your table and click OK:
• Width: 3”
• Depth: 3”
• Height: 2’5”

9. Click to place the leg just inside one of the corners of the tabletop, as shown in
the graphic:

Instead of creating three more table legs from scratch, you can use the Mirror tool to copy
the first table leg.
This method is quick and ensures that the legs are placed symmetrically around the table.
10. Click the 3D View icon.
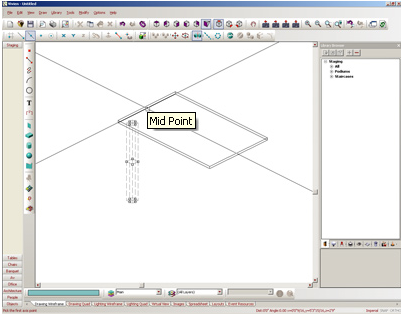
11. Click to enable Midpoint Snap, which will help when selecting the start- and end-points of the mirror lines.
12. Select the leg you just placed. From the Modify menu, choose Mirror.
13. “Snap” to the edge of one of the short sides of the tabletop (near the middle of the bottom surface), as shown below. Click to place the first point of your mirror line.
14. Snap to the opposite side of the tabletop and click to finish the mirror line, as shown below.
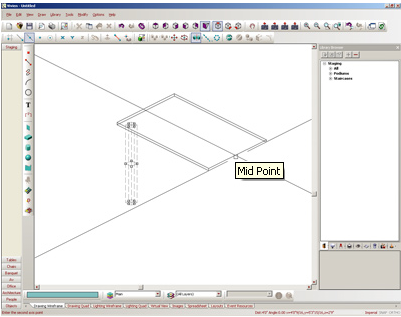
15. Press CTRL on your keyboard and click to select both legs at once. This ensures that you create the remaining two legs simultaneously.
16. From the Modify menu, choose Mirror.
17. This time, click to snap to the middle of each of the long sides of the tabletop.

18. Select all five risers (tabletop + four legs) at once. From the Modify menu, select Group. Grouping the five risers as one object makes it easier to move the table around.
Your finished table should look like this:

Table #3: Tall, single-pedestal, stand-up bar table
In this example, you’ll create a bar table that is 4’4” tall with a round tabletop of 2’9” diameter and a 2’ wide base.
1. From the View menu, choose View Type and then choose Plan. The first table element that you will create is the central upright pedestal.
2. From the Draw menu, select Cylinder and type the following dimensions:
• Height: 4’2”
• Diameter: 3”

3. Click OK. In the work area, click to place the central pedestal of the table in the desired location of the venue design.
Next, you will draw two risers that crisscross to create four 1” square feet. You’ll place the feet on the floor under the pedestal. Let’s start with the first foot.
4. From the Draw menu, select Riser. In the New Riser dialog box, type the following dimensions for your table and click OK:
• Width: 2’
• Depth: 1”
• Height: 1”

5. In the work area, click to place the riser in your drawing, ensuring that it crosses the pedestal to form a stabilizing base. Use the following graphic as a guide.

And now, the second foot. To crisscross the feet, you need to place the second riser at 90 degrees by swapping the depth and width from what you specified for the first riser.
6. From the Draw menu, select Riser. In the New Riser dialog box, type the following dimensions for your table and click OK:
• Width: 1″
• Depth: 2’
• Height: 1″

7. In the work area, click to place this riser as shown in the following graphic.
(Remember: You are looking down at the four stabilizing legs under the central pedestal.)

Now you are ready to create the tabletop.
8. Click the 3D View icon.
Remember, the Height value in Vivien keeps the last setting until you reset it. Before drawing the tabletop, you need to set the height at which it will be placed.
9. On your keyboard, press TAB. In the Height dialog box, type 3’11”, and press OK.
10. Click to enable Centre Snap. This ensures that the centre of the circular tabletop—a cylinder—is placed at the centre of the upright pedestal.
11. From the Draw menu, click Cylinder.
12. Type the following dimensions:
• Diameter: 2’9”
• Height: 2”
13. Click OK, and click to snap the tabletop cylinder to the centre of the upright pedestal, as shown below.

14. Click and drag a selection box around all elements of your table to select all elements at once.
15. From the Modify menu, click Group to group all elements as one object.
16. Save your file. To view your drawing in 3D click Virtual View.

Now you are prepared to draw virtually any table that your clients might ask for!